Pages

Sunday, November 17, 2013

This Day on the Battlefield: Ticinus

OK so well, it might not really be "this day" because no known exact date is given for this battle. All we know is that it took place in November of 218 B.C. This was the first open engagement of the 2nd Punic War, which would rage across the Mediterranean for the next twenty years. Opposed to each other were the forces of the Roman Consul Scipio the Elder (the father of the soon-to-be Scipio Africanus) and the famous Hannibal Barca, who was about to give the Romans their first lesson in the combined arms tactics that he so excelled at.

The Campaign:

Hannibal's famous crossing of the Alps took place earlier in the month. Bringing his army across the treacherous mountains, in November, complete with horses and elephants, is rightly considered one of the greatest logistical triumphs in military history, and has been celebrated ever since. Hannibal did lose a large portion of his army in the process of crossing the imposing mountains, but he did succeed in getting the bulk of his fighting force into Italy, right in Rome's backyard.


Low on supplies from the crossing, Hannibal was forced to survive on the means he could, and needed to contend with the Gallic tribes in the north of Italy. After leveling a settlement of the Taurini, he was able to secure the allegiance of the other Gauls in the area.

This caught the attention of the Romans and Scipio set out to engage him, taking a reconnaissance party.

Disposition of the Forces:

This was not a full-out engagement between two entire armies, but is more in line with a relatively light skirmish. Hannibal's force consisted entirely of cavalry, while Scipio's consisted of cavalry and light skirmishing infantry known as Velites.

Velites were usually around 16-20 years of age and were not full members of the Roman legion that engaged in combat with sword and shield, but threw javelins at the enemy and then retreated behind the main line of heavy infantry.

Part of Hannibal's cavalry force consisted partially of the famous Numidian cavalry- swift, skilled riders on light horses. This cavalry force was vastly superior to the Romans' own cavalry, and would prove crucial time and again in Hannibal's major battlefield victories. These were formed on the flanks of his army while his other cavalry formed the center.

A sketch of the Numidian Cavalry


The Battle:

The outcome was pretty simple. Hannibal ordered a charge along his cavalry line, neutralizing the Velites. A general cavalry engagement then followed, during which the Roman cavalry got outflanked by the fast-riding Numidians.

The Romans retreated, and the only real notable action their side performed that day was the Consul's son- the future Scipio Africanus, saving his father's life during the battle.

Aftermath:

Since the battle was little more than a scouting engagement, it did not have a major impact on the war- but it did signify that Hannibal had arrived, and showcased the effectiveness of his cavalry. This is something the Romans would underestimate to their own peril.

See Also:

Livy's account of the battle.
Polybius' account of the battle. Battle of Ticinus 218 B.C. 2nd Punic War Hannibal

Wednesday, November 6, 2013

This Day on the Battlefield: Lutzen

November is a time that is late in the traditional campaigning season, and not many battles are fought in the mid-point of autumn, as armies moved toward their winter quarters, preparing for the next campaign in the Spring. Nevertheless, it was on this date (ten days later in the modern Gregorian Calendar, but still traditionally marked on the date of the old Julian Calendar) in 1632 that one of the most important battles of the devastating Thirty Years' War occurred- Lutzen. It was here that the Protestant forces, though victorious, suffered a horrible loss- the leader which had singularly rescued their cause from certain destruction.


Background:

Begun in 1618, the Thirty Years' War was actually a series of smaller wars from the period 1618-48 which were fought primarily on German soil. Religious as well as political reasons existed for the conflict, which was the last and most destructive of the religious wars set off by the Reformation.

Things at first did not appear to be going well for the Protestant princes in Germany. Defeat at the Battle of White Mountain (1620) removed Frederick V from the Bohemian throne and caused confusion. Christian IV of Denmark intervened and was in turn defeated. The Treaty of Lubeck was a humiliation, forcing the Danish King to surrender territory and abandon any support for Protestant powers in the Holy Roman Empire.

Led by talented generals in Johann Tserclaes, Count of Tilly, and Albrecht von Wallenstein, it seemed that nothing would stop the Catholic Imperial forces from overrunning all of Germany and bringing the heretical Protestant sect to heel at last.

It was at this point that a "lion from the North" emerged, succeeding where Christian IV failed. Gustavus Adolphus, King of Sweden, landed in northern Germany. He would go on to defeat Tilly at the decisive Battle of Breitenfeld in September 1631, paving the way for a new era in battlefield tactics and shattering his formidable Catholic army. Gustavus defeated Tilly again at the Battle of Rain, this time costing the latter his life (as an aside, there is a touching story of this battle that I've written about here on one of my other blogs).

In a year, the tide of the war had changed completely. Gustavus was now in control of most of Germany. Left with no other options, the Holy Roman Emperor, Ferdinand II, was compelled to recall Wallenstein, who he never fully trusted.

The Campaign:

Wallenstein had success in the 1632 campaign, defeating the Saxons and even inflicting a loss on Gustavus himself at the Battle of Alte Veste. Saxony was now under threat and it was imperative that this hotbed of Protestantism be protected.

In November, Wallenstein began to move toward winter quarters at Leipzig (incidentally, very near the vicinity where Breitenfeld was fought). He did not expect any more moves from Gustavus because the campaigning season was at its end. Wallenstein split his forces, sending part of them toward the Rhineland under General Pappenheim.

Hoping to surprise Wallenstein, Gustavus set out from his camp to attack the Imperial army. When he heard of this, Wallenstein gathered what forces he could and made ready for battle, setting up a strong defensive position. Gustavus' gambit to take Wallenstein by surprise had failed.

The two armies met near the village of Lutzen.

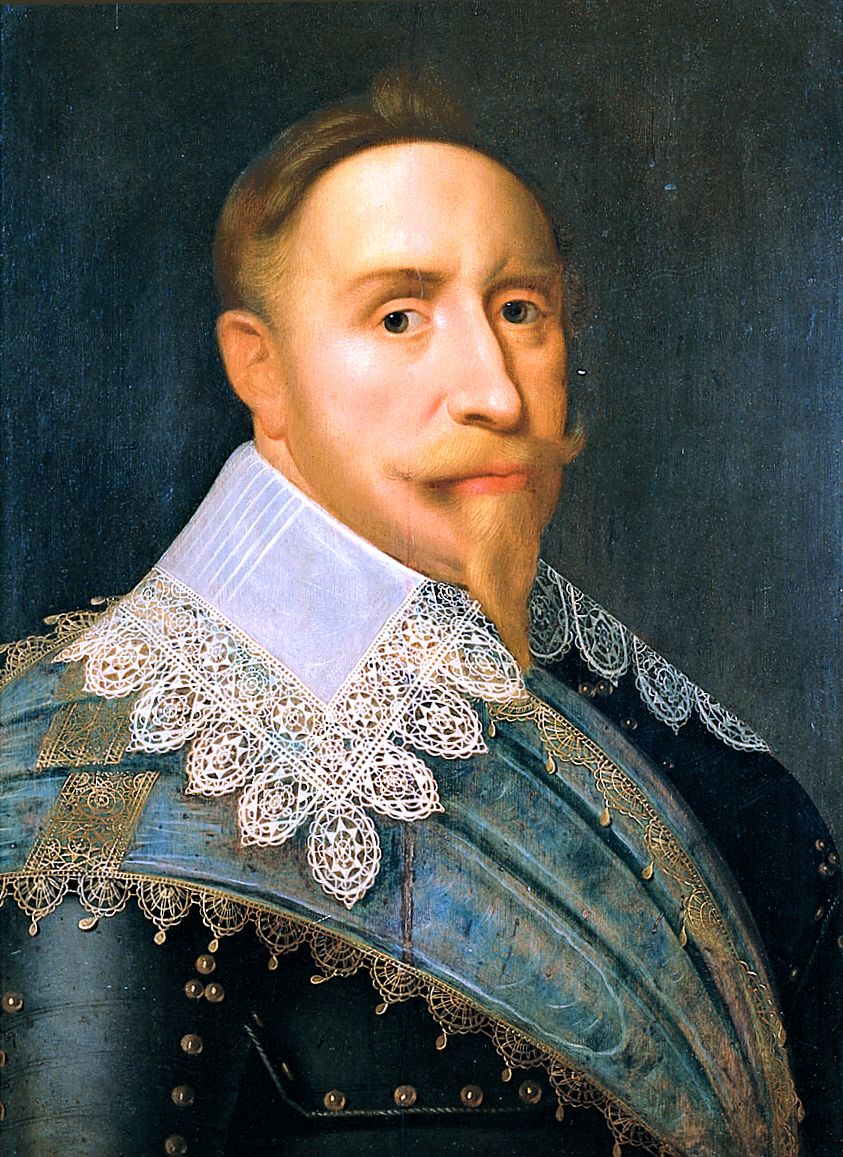
Gustavus Adolphus of Sweden

Albrecht von Wallenstein

The Battle:

Positioning of the forces

Phase I:

The battle began with a Swedish cavalry assault on Wallenstein's left flank, which was weak. After some initial success, Pappenheim arrived on the field and began to push the Swedes back. However, the general was mortally wounded in his counterattack. He would not be the only notable casualty.

In the confusion of the charge, Gustavus got separated from his men and was shot in the back by an Imperial musketeer. He died on the field, and the Protestants lost their champion.

http://upload.wikimedia.org/wikipedia/commons/a/aa/Battle_of_Lutzen.jpg
Gustavus' death

Phase II:

The Swedish center had begun advancing on the entrenched Imperial center and right. Led by the battle-hardened Yellow and Blue regiments, the infantry marched forward, but was crushed by Imperial artillery and musket fire. To add more injury to the picture, the Imperial left wing cavalry rode in to flank the Swedish assault. The infantry assault as expected panicked and broke, with the Yellows and Blues, the best of the Swedish army, being almost totally destroyed.

The King's Chaplain, Jakob Fabricius, then began to rally the retreating men, and General Dodo Freiherr zu Innhausen und Knyphausen (did you get that?), a trusted professional soldier, held the reserves steady, and thus began to restore order amongst the fleeing infantry.

Phase III:

After a lull in the battle, the Protestant second-in-command, Bernhard of Saxe-Weimar, organized another attack. This last phase would come down to the grim 'push of pike.' This latter part is somewhat ironic, because a central piece of Gustavus' Adolphus' success in the war was the rescinding of the importance of pike formations in his army, with long lines of musketeers that could bring maximum firepower to bear against an enemy taking preeminence.

The Swedish infantry eventually broke through and took the Imperial artillery position, rendering their entire line vulnerable. In this atmosphere, Wallenstein had no choice but to retreat, despite additional reinforcements arriving later.

Aftermath:

Both sides suffered about the same number of casualties (several thousand). Tactically, the Protestant forces could claim victory, as the Imperial Catholics retreated from the field. Strategically, Saxony was also saved from invasion. However, in the meantime, the Protestants lost Gustavus Adolphus, who saved them from destruction.

His body was returned to Sweden in early 1633 and buried in Riddarholm Church. He was voted to be called 'Gustavus Adolphus the Great.' No other Swedish monarch shares the moniker.

 File:Hellqvist - Gustaf II.jpg

Assessment:

The close Swedish victory at Lutzen could be seen as a short-term strategic gain, but a long-term strategic loss. The Imperial military continued to recover nicely, and dealt its Protestant foes severe defeats such as at Nordlingen in 1634. Gustavus' death opened the way for the seesaw of the Thirty Years' War to reverse again.

With Gustavus' death, the best chance at ending the Thirty Years' War was halted, and the tumult would continue for another sixteen years. Germany would feel the terrible effects of this continued bloody seesaw between its Protestant and Catholic Princes.

See also:

A very good summary of the campaign and battle by Pierre Cloutier Battle of Lutzen 1632 Thirty Years' War

Friday, November 1, 2013

Ivy Mike: The First H-Bomb

It was on this day 61 years ago that the world entered the thermonuclear era. At the Enewetak Atoll, the arms race entered a new and dangerous phase as a device that made the terrible explosives used on Hiroshima and Nagasaki at the end of World War II look like ants was detonated.


Background:

In 1949, the Soviet Union successfully detonated its first atomic device- RDS-1. It was modeled on the Fat Man device dropped on Nagasaki and had a similar yield. While the United States had earlier added more powerful weapons to its stockpile as demonstrated in tests such as Operation Greenhouse, the Soviets acquired the bomb years earlier than expected, and Washington was alarmed that it may lose its preeminence in atomic weapons if it failed to push the envelope and test more powerful bombs.

The RDS-1 test convinced President Truman that it was necessary to develop a hydrogen bomb, where part of the explosive yield would be produced by nuclear fusion.

A fusion device was speculated about as early as the Manhattan Project, but the possibility had never been seriously attempted until this time.

The Project:

Edward Teller, a veteran of the Manhattan Project and the main advocate of the idea of a hydrogen bomb since then, was called in to work on the new project at Los Alamos National Laboratory. What emerged out of all the complicated physics was the Teller-Ulam device- a sort of layered bomb wherein one fission reaction would set off a fusion reaction, followed by another fission reaction.


This was a breakthrough. Not only did it demonstrate that a hydrogen bomb was theoretically possible, but the design also broke free of any limits to a bomb's destructive power. While a classical fission device like the bombs used up to this point had an upper limit in terms of destructive power (the 500 kiloton Ivy King bomb, the second shot in the Operation Ivy series, was the most powerful non-thermonuclear device ever tested), thermonuclear bombs do not have any such limit. In theory, it would be possible to build a hydrogen bomb powerful enough to destroy a planet for instance (though finding enough fissile material to do this would certainly be a problem!). This would be done by adding additional fusion-fission stages to the bomb.

The Device:


Codenamed "Sausage," the Ivy Mike device was not actually designed by Edward Teller himself, but Richard Garwin, on Teller's suggestion. It was massive, weighing 73.8 metric tons and was two-stories tall. Part of the reason for the size of the device was the need for supercooled liquid fuel to induce the fusion reactions.

The Sausage device, to the left

The Shot:

Edward Teller was not present for the final test of his design (as the video above shows). The time scheduled for the detonation was 7:14 A.M. local time. The test was a success. The mushroom cloud reached a maximum height of 36.5 kilometers and had a diameter of 96.5 kilometers (Nuclear Weapon Archive). Ivy Mike vaporized the island it stood on and left a large crater that is still visible today, as seen below:


The estimated yield of the blast was 10.4 megatons- hundreds of times more powerful than any atomic device ever detonated before that point.

As I suspect you've seen by now in the above video, Edward Teller received the news of the successful test not from a telephone, but by using a seismograph. His simple message back to Los Alamos was "It's a boy." This signified that the project to develop a hydrogen bomb was successful.

Aftermath:

The successful detonation of the Sausage device proved that the Teller-Ulam design worked in reality. Ivy Mike however, was far too big to be weaponized. It was merely a rather fiery and spectacular experiment that proved that the hydrogen bomb design was sound. The Soviets derisively called Ivy Mike something like a fusion factory- because that's what it was. Nevertheless, the arms race would now take an even more explosive and dangerous turn. Operation Ivy touched off the next wave of testing to weaponize the hydrogen bomb- Operation Castle, which would produce weapons even more fearsome.

See also:

Making the H-Bomb (more background, including the economic and geopolitical context)
Operation Ivy project film
Operation Ivy at Nuclear Weapon Archive Operation Ivy Mike Thermonuclear Weapon Cold War